VSI+
Video Serial Interface: Version 11

Operations Manual
Copyright (c) 1993, 1994, 1995, 1996
TransAmerican International, Inc.
VSI + Manual Contents
New!! ---VSI+ Programming Guide in Slide-Show format
VSI+
Video Serial Interface: Version 11
Operations Manual
Copyright (c) 1993, 1994, 1995, 1996
TransAmerican International, Inc.
VSI + Manual Contents
New!! ---VSI+ Programming Guide in Slide-Show format
- Powerful Data Filtering Algorithms
- Easy On-screen Menu driven Setup and Programming
- Auto Baud Rate Detection- Eliminates Internal Dipswitch setting!
- 24 Field Programmable Exceptions with Numeric Range Operators & Exception String to provide Greater than, Less than, Equal to Exceptions, in between or out of the numeric range
- On-screen Flagging of Exceptions with Asterisk or Reverse Text
- Programmable Alarm Outputs.
- Alarm Input for Drawer Open, Safe Open, etc.
- Serial Output of all data or Exceptions to Printers, Computers, or Modems
- Programmable Delay Screen Blanking
- Your Choice of 1 to 9 lines displayed on-screen
- On-screen Titler up to 20 Characters
- 10 Character Sizes
- Gray Scale and Border Selection from front panel
- Built-in Test Mode
- Built-in Cash Register Demo
- EX Options provides 2 fully programmable hard wire alarm output
- VSI+16 for 16 Alarm Outputs
- Upload/Download Programming to a PC or another VSI+
Connecting Your VSI+
The VSI+ will overlay the characters on any input video source. The video input can be virtually any baseband or composite video source. The VSI+ will accept NTSC, RS-170, RS-330, CCIR, PAL, or SECAM video formats.
The Video input to the VSI+ is a standard BNC connector, terminated at 75 ohms. IMPORTANT: The input video level must be 1V P-P. If this level is not maintained within +/- 20%, the VSI+ will have difficulty locking the character display over the input video source.
After completing the interface installation as described in the separate Installation Guide for your specific Cash Register, Computer, Radar Gun or other serial device, connect the video input source to the video input BNC on the rear of the VSI+.
Note: The VSI+ will not enter the programming mode unless it is connected to a video source.
The BNC video output goes out to the video system (VCR, Quad, switcher, Multiplexer, or monitor.)
The video output from the VSI+ is 1V P-P into a 75 ohm load. Most monitors or televisions with direct video inputs are terminated with a 75 ohm load. If the monitor is not terminated, the VSI+ will output 2V P-P.
VSI+ Connections

EX Option- External Alarm OutputsWith the optional EX daughter board installed, you will be able to tie your exceptions to 2 open collector hard alarm outputs. To utilize this board you must either purchase the EX triport connector from AVE, or physically add wires to the DB-9 connector which plugs into the rear of the VSI+. Pin 1 on the DB-9 is Alarm 1, and Pin 9 is alarm 2, Pin 5 is ground for both alarm outputs. Be sure to observe polarity and do not exceed the 5V, 20mA rating of these alarm outputs. See page 58 for additional information.
AVE also offers the VSI+16. This special VSI+ gives you 16 alarm outputs via a rear panel mounted DB-25 connector. The pin out for this DB-25 connector appears on page 61.
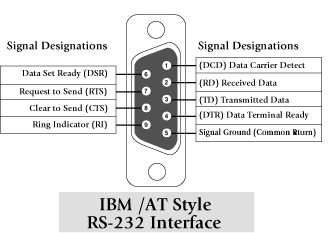
RS-232 SERIAL INPUT
The VSI+ accepts RS-232 serial data via the DB-9 female connector located on the rear of the VSI+. This connector is similar to the "AT" type computer RS-232 serial ports and the pin out is identical.
|
PIN# ----------------- Signal Name (RS-232) ---------------- VSI+ 1 ----------------- CD (Carrier Detect) ---------------- Optional EX alarm trigger 2 ---------------- RXD (Receive Data) ---------------- RXD 3 ---------------- TXD (Transmit Data) ---------------- TXD 4 ---------------- DTR (Data Terminal Ready) ---------------- Always True 5 ---------------- SG (Signal Ground) ---------------- GND 6 ---------------- DSR (Data Set Ready) ---------------- Always True 7 ---------------- RTS (Request to Send) ---------------- CTS (Optional) 8 ---------------- CTS (Clear to Send) ---------------- RTS (Optional) 9 ---------------- RI (Ring Indicator) ---------------- Optional EX alarm trigger |
A FEW WORDS ABOUT PROGRAMMING
The VSI+ is programmed by pressing and releasing specific combinations of the four front panel push-buttons. Via these four simple buttons, all of the powerful programming features of the VSI+ Text Inserter are available to you. A video source and a monitor must be connected in order for you to see the programming menus.
The following sections provide detailed programming instructions.
VSI+ Version 11
Operation and Programming GuideAfter you have completed the installation of the VSI+ and any additional interfaces and cabling, follow the power-up sequence as described in the installation instructions for your specific device. Make sure that you have a video signal present from the camera that the VSI+ is using. If required, go into the VSI+ Register Select programming menu and select the appropriate register (all CR boards and N2RS-based Interfaces operate on the Generic or All Others Selection). See Pg. 59 for a listing of the various Register Select menus, which change depending on which version of the VSI+ ordered.
If all of this was successful, you will be presented with the following message on the video monitor screen:
BAUDRATE DETECTION...
This prompt is generated by the VSI+ and tells us the VSI+ is ready and waiting for something to happen. The BAUDRATE DETECTION feature will automatically detect the Baud Rate of your device when you enter a transaction on a register . Upon receiving data from the device, the VSI+ will display the following message:
DETECTED: 2400
(or whatever the actual baud rate for your particular device is) and thn the rest of the transacted data will appear..
If you received the message: "DETECTED" (Baud Rate)" and the rest of the transaction appears on-screen, you are ready to format your VSI+. If data does not appear go to the Problem Solving section starting on page 45.
Front panel user controls are provided to allow simple changing of the display's vertical and horizontal position and the gray scale or border. This eliminates the need of the user to enter the main menu and possibly change important programming setups.
|
|

|
To access the main menu of the VSI+, simultaneously hold down the "DOWN" & "UP" buttons and press & release the "RESET" button and then release the "DOWN" & "UP" buttons. This will take you to the main programming menu of the VSI+. To navigate through this menu, simply use the "DOWN" & "UP" buttons to position the arrow in front of the desired function, then press "SET" to access that section.
If you have difficulty entering the Main Menu, try the following procedure exactly:
With your left thumb lightly press and hold in the 3 buttons to the left (Up, Down, & Set). While holding down these buttons, press and release the Reset button with your right thumb. Then release the other buttons.
If a sub menu has an "EXIT" selection, always go there and press "SET". Pressing "RESET" at the main menu exits you from the programming mode.
VSI+ MAIN PROGRAMMING MENU
- REGISTER SELECT
- SCREEN SETUP
- TEXT DISPLAY
- COMMUNICATION
- EXCEPTION REPORT
- ALARM OUTPUTS
- TEST/DEMO MODE
- DWN/UP LOAD SETUP
- HELP
Following is a detailed description of the Menu selections and the programming capabilities of the VSI+.
VSI+ VERSION 11 REGISTER SELECT MENUS:
The register select menu for your VSI+ may differ from the example shown under REGISTER SELECT in this manual (pg. 13). Refer to the following list of menus for your particular version. If you don't know what version of the VSI you have, there are three ways to determine.
1. The version number appears on the white label on the bottom of the VSI.
2. If this label is missing or the version number is not there, the remove the two screws from the bottom of the case and lift the
top cover off. The VSI version number is written on the big Eprom on the motherboard.3. In Versions 11.00R8 and R9 you can access the Version ID in the Test/Demo mode menu.
4. As a last resort, you can get the version number to appear on the screen by performing a MASTER RESET. Be warned that a MASTER RESET will reset the VSI back to the factory defaults and erases all previous programming! See page 47 for information on how to perform a master reset.
Version 11.00
In this manual we will be using the VSI+ Version 11.00 menu for programming instructions. Examples of other menu versions are listed below. The full menu differences appear on pages 62-64.
|
Version 11.01 Version 11.02 Version 11.03 |
Version 11.04 Version 11.06 Version 11.08 |
NOTE: As we continually add new registers, these menus are subject to change.
REGISTER SELECT
Choosing this will bring up a sub-menu consisting of the following register selections: (Gasboy & Gilbarco will present sub-menus)
REGISTER SELECT SUB-MENU (Version 11.00)
|
Position the arrow cursor in front of your register selection and press & release "SET". The "REGISTER SELECT" menu automatically formats the VSI+ to match the register's communications settings (i.e. Baud Rate, Parity, etc...). However, if you need to change these settings, you can do so through the "COMMUNICATIONS" menu described later in this manual.
Note: Whenever you select a register in this menu certain programming features are reset to the default settings. Always set the register selection first, get data on-screen, then proceed with additional programming.
SCREEN SETUP
Place the arrow cursor in front of SCREEN SETUP and press and release "SET"; you will be presented with the following sub-menu:
SCREEN SETUP SUB-MENU
|
To change the size of the characters on the screen, position the arrow cursor in front of "CHARACTER SIZE" and press and release "SET". A grid of character blocks will appear on-screen. Use the "UP" or "DOWN" buttons to cycle through the selections. There are 10 character sizes to choose from. The character block is 9 lines X 20 characters for a total of 180 characters displayed on screen, however choosing a larger display size may not display all characters on screen. If the screen skews during this setup mode, this is normal. Large characters off screen will effect most monitors this way.
To change the display border and/or the gray scale of the text on-screen, position the arrow cursor in front of "BORDER/GRAY SCALE" and press and release "SET". Cycle through the selections by pressing the "UP" or "DOWN" buttons. There are 10 settings to choose from. Make your selection and press and release "SET" to return to the main menu.
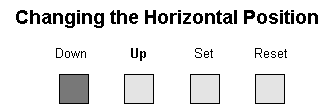
To change the horizontal position of the inserted text on-screen, position the arrow in front of "HORIZONTAL POS" and press "SET". Press the "UP" or "DOWN" buttons to move the text to the desired horizontal position.
To change the vertical position of the inserted text on-screen, position the arrow in front of "VERTICAL POS" and press "SET". Press the "UP" or "DOWN" buttons to move the text to the desired vertical position.
EXIT
Place the arrow in front of "EXIT" and press "SET" to return to the main menu.
TEXT DISPLAY
This menu will give you more control over the actual text block formatting and its appearance on the screen. Position the arrow in front of "TEXT DISPLAY" and press and release "SET". You will be presented with the following sub-menu:
TEXT DISPLAY SUB-MENU
|
This is the amount of time that the VSI+ text display will remain on-screen after a transaction before blanking itself off (not the video picture, just the register transaction data) until the next transaction. The choices are (in seconds):
NONE, 6, 12, 20, 30, 60, 120, 180, 300
To change the "SCREEN BLANK" setting, place the arrow in front of SCREEN BLANK and press "SET". The arrow will begin flashing. Now, by pressing the "UP" or "DOWN" buttons, you can cycle through the selections. Press and release "SET" when the desired time is displayed. The arrow stops flashing and you may continue programming.
NOTE: Choosing "NONE" means No Blanking. The VSI+ will display the last transaction until a new transaction is performed.
You have the choice of how many lines of text to display on-screen for register transactions. The choices are:
1 THROUGH 9.
To change the "DISPLAY LINES" setting, place the arrow in front of DISPLAY LINES and press "SET". The arrow will begin flashing. Now, by pressing the "UP" or "DOWN" buttons, you can cycle through the selections. Press "SET" when the desired number is displayed. The arrow stops flashing and you may continue programming.
NOTE: All register transaction data will scroll up regardless of the number of lines you choose to display on-screen and the more lines you display on-screen, the greater the amount of time that the transaction data will be recorded. However, some applications may limit the number of lines and the size of the on-screen display. Note: If you are using an on-screen title, it will occupy Line 1, leaving 8 lines for the text insertion.
Place the arrow in front of "ONSCREEN TITLER" and press and release "SET". You will be presented with the following sub-menu:
|
ONSCREEN TITLER SUB-MENU
|
CHOICES - ON OR OFF
To change the status of the on-screen titler, position the arrow in front of "TITLER" and press "SET". The arrow will start flashing. You can now change whether to display the titler by pressing either the "UP" or "DOWN" button. This will toggle between the "ON" and "OFF" selection. Once you have made your selection and it is displayed, press "SET". This will return the arrow to the non-flashing mode so you may continue.
TITLE
The VSI+ gives you the option of a 20 Character display for easy register identification in addition to the actual register transaction data. To create a title, position the arrow in front of "TITLE" and press and release "SET". You will see a row of 20 boxes and the first box will by flashing. To change the character in the first position, press the "UP" or "DOWN" buttons to cycle through
the alphanumeric selections from the following list of available characters:ABCDEFGHIJKLMNOPQRSTUVWXYZ
0123456789*-+.,:'=!?&][The solid white box is used for a blank space. Make your selection and press and release "SET". This will advance to the next block, repeat until you have entered the desired title. When finished, simultaneously press and release the "DOWN" & "UP" buttons to enter your title into memory. The white boxes will disappear and your title will be displayed as it will appear on screen. To return to the sub-menu and continue programming place the arrow in front of exit and press and release "SET".
Note: Remember, enabling the TITLE will limit text insertions to 8 lines maximum.Truncate can be either "ON" or "OFF". If TRUNCATE is ON, then all text over 20 characters will be chopped off. If TRUNCATE is "OFF" then text will be wrapped to the next line.
Position the arrow in front of TRUNCATE and press and release "SET"; the arrow will start flashing. Cycle between ON & OFF by pressing either the "UP" or "DOWN" buttons. After making your choice and it is displayed, press and release "SET". The arrow will stop flashing and you can continue programming your VSI+.
(Set your Exceptions first, before enabling this feature.)
The VSI+ automatically compresses the spaces in a line first as it reaches 20 characters. With LINE COMPRESS "ON" the VSI+ will additionally remove multiple spaces and vowels from the text to further compress the display as necessary. To make this selection, position the arrow in front of "LINE COMPRESS" and press and release "SET"; the arrow will start flashing. Cycle through "ON" or "OFF" by pressing either the "UP" or "DOWN" buttons, and press and release "SET" when your choice is displayed. The arrow will stop flashing, and you can continue programming.
When "LEFT JUSTIFIED" is on, the VSI+ will start each line of text with no leading spaces from the left margin of the text display block.
Scroll delay ensures that lines of text remain on screen a minimum of .5 seconds. This is especially useful with registers that run at a high Baud Rate or Time-lapse VCRs in extended record modes, switchers, or multiplexers. Sometimes, the register can produce characters so quickly that they can scroll up too fast on the screen to be recorded. When "SCROLL DELAY" is "ON", the VSI+ slows down this data feed just enough to insure that each line of text is recorded.
The choices for "SCROLL DELAY" are either "ON" or "OFF". To make this selection, position the arrow in front of "SCROLL DELAY" and press and release "SET". The arrow will start flashing. Cycle through "ON" or "OFF" by pressing either the "UP" or "DOWN" buttons, then press and release "SET" when your choice is displayed. The arrow will stop flashing, and you can continue programming.
NOTE: At high Baud Rates and Scroll Delay on, the internal buffer of the VSI+ may overflow. This will cause lost text. The internal buffer can only hold up to 512 characters before overflowing.
You have the choice to globally turn on or off the complete VSI+ text insertion function. This means no data will be visible on the monitor if you select "DISPLAY" off. However, if you select the "DISPLAY" off, you can still command each exception independently to either display on-screen or not, through its program setup menu under "EXCEPTION REPORTS". You may also choose to enable an alarm output to occur during an exception while not displaying the exception data through the program setup in the "ALARM OUTPUTS" menu..
With the display "OFF" , the VSI+ will still perform all functions as programmed (for example; exception reporting) but the information will not appear on screen unless programmed to do so in the "EXCEPTIONS REPORT" menu.
DISPLAY APPLICATION EXAMPLES
You may want to display only the totals of a sale for use as a customer display. See additional information in the EXCEPTION REPORTS section.
You may use the VSI+ or the VSI+16 as a controller for a car wash instead of as a text inserter. Assign the car wash key on the register to an exception and use the alarm output to command the car wash to allow one wash. You can use multiple alarms with different keys for hot wax or drying.
Some registers use one journal printer for all transactions in the store and one for credit cards at the pump. You can use one VSI+ to monitor all pump card authorizations and use the alarm outputs to home a camera to the pump when authorization is given. In this application, the display would be off, but all exceptions and alarms would be on. This would text insert only the outdoor credit card sales. Another VSI+ could be used to text insert and except for all other transactions.
EXIT
Place the arrow here and press and release "SET" to return to the VSI+ Main Menu.
COMMUNICATION
This was discussed briefly in the section under "REGISTER SELECT" and will be fully explained here. When you choose your register type under the "REGISTER SELECT" menu, this automatically formats the VSI+ to the appropriate settings needed to communicate with your register. There may be times when you will need to amend these settings for a specific register.
To access the "COMMUNICATIONS" menu, place the arrow in front of "COMMUNICATION" and press "SET". This will bring up the following sub-menu:
COMMUNICATIONS SUB-MENU
|
Choices: AUTO, 150, 300, 600, 1200, 2400, 4800, 9600, 14.4 19.2, 28.8
The Baud Rate for your register should be detected on start-up. Every time you RESET the VSI+, it will automatically detect for the Baud Rate until you program it in here. To set the Baud Rate for your particular device, place the arrow in front of "RX Baud Rate" and press and release "SET". The arrow will start flashing. You can now use the "UP" or "DOWN" buttons to make your selection. When your selection appears, press "SET"again. The arrow stops flashing and you can proceed to the next menu item for programming.
Choices: AUTO, 150, 300, 600, 1200, 2400, 4800, 9600, 14.4, 19.2, 28.8
The default is 2400.
This is a new feature that allows you to set the transmit baudrate to a separate device if you are looping the data back out of the VSI+.
To set the TX Baud Rate for your particular device, place the arrow in front of "TX BAUDRATE" and press and release "SET". The arrow will start flashing. You can now use the "UP" or "DOWN" buttons to make your selection. When your selection appears, press "SET"; the arrow stops flashing and you can proceed to the next menu item for programming.
Choices: NONE, ODD, EVEN
Place the arrow in front of "PARITY" and press and release
"SET". The arrow will start flashing. You can now use the "UP" and "DOWN" arrows to make your selection. When your selection appears, press "SET"; the arrow stops flashing and you can proceed to the next menu item for programming.Choices: 7 or 8
If you select 7 Data Bits, you must select "ODD" or "EVEN" Parity in the Parity menu. Place the arrow in front of "DATA BITS" and press and release "SET". The arrow will start flashing. You can now use the "UP" & "DOWN" arrows to make your selection. When your selection appears, press "SET"; the arrow stops flashing and you can proceed to the next menu item for programming.
Choices: ON, OFF
Handshaking is an electrical signal that tells the Cash Register or Computer that the VSI+ is ready to receive data. Handshaking may not be necessary and/or may be connected to an outgoing signal from the Cash Register or Computer since the VSI+ does not require Handshaking. The VSI+ Handshaking signal is always present.
Handshaking guarantees that the internal buffer is not over run or text is not lost. Most AVE interfaces do not require this function.
Place the arrow in front of "HANDSHAKING" and press and release "SET". The arrow will start flashing . You can now use the "UP" & "DOWN" arrows to make your selection. When your selection appears, press "SET"; the arrow stops flashing and you can proceed to the next menu item for programming.
Choices: ON, OFF
Some cash registers or computers, after sending a line of data, return to the first position of the same line. AUTO LINEFEED makes the VSI+ drop to the next line. This may not be necessary depending on the Cash Register or Computer being used.
Place the arrow in front of "AUTO LINEFEED" and press and
release "SET". The arrow will start flashing . You can now use the "UP" & "DOWN" arrows to make your selection. When your selection appears, press "SET"; the arrow stops flashing and you can proceed to the next menu item for programming.Choices: ON, OFF
The VSI+ can send RS-232 data out to another serial device. Some computers or cash registers require a response from the VSI+ while others do not. On cash register or computers that do not require a response, this OUTPUT feature may be used to send all or selected data to a serial printer, a computer modem or other serial device. This is a GLOBAL serial data output command. If the OUTPUT is turned OFF here no data is sent to the output port, unless output is turned on in the Exception Report menu. If the output is turned on here all data is sent to the output port, unless OUTPUT in the EXCEPTION REPORTS menu is turned off.
Place the arrow in front of "OUTPUT" and press and release "SET". The arrow will start flashing . You can now use the "UP" & "DOWN" arrows to make your selection. When your selection appears, press "SET"; the arrow stops flashing and you can proceed to the next menu item for programming.
EXIT
Returns to main menu.
EXCEPTION REPORTS OVERVIEW
The Exception Report gives you the option to assign an on-screen flag, trigger an alarming device, or send data to another serial device on any questionable transaction that you have preprogrammed into the VSI+. The VSI+ will allow programming of up to 24 separate exceptions. These exceptions can be VOIDS, REFUNDS, COUPONS, PAID OUT, RETURNS, Individual Departments, Specific Items, or any transaction that you determine to be "exceptional" or questionable.
You may even set ranges for some exceptions; for example: All Liquor sales over $10.00, sales of .01, all sales over $100, all transactions by a specific cashier, all sales between $8.00 and $25.00 or all sale lower than .10 and greater than $10.00, or whatever transactions you need to watch "exceptionally" close.
You have several options for programming your Exception Report.
The first option typically has all programmed exceptions display a flashing asterisk in the upper right corner of the on-screen display, or Reversing the entire Text Display. This ON-SCREEN FLAG is controlled through the "ALARM OUTPUTS" menu. You assign a corresponding Alarm to an Exception and set the parameters for the FLAG in this menu.
You do this by choosing "DISPLAY" for the corresponding Exception No. and selecting "ON". With this option, all questionable transactions (exceptions) will be "flagged" with the flashing asterisk. You can then review these exceptions by putting your VCR in play and pressing the FF button. This will give you a fast scan of the tape and you can go into normal play when you see the flashing asterisk and view that transaction in real time or slow play or frame by frame, depending on the type of playback options of your particular VCR.
HARD ALARM OUTPUT- EX OPTION
The VSI+ with the EX option or the VSI+16 allows you to program exceptions to trigger external alarming devices such as Time-Lapse VCR's, Quads, Enunciators, LED's etc. Using the EX option, you can have your time-lapse VCR record only exceptions, or have an alarming Quad go to full screen on an exception, or even trigger a buzzer to alert you that an exception has occurred. This hard alarm feature is provided via the EX option, which is a 2 alarm plug-in daughter board for all VSI+s, or if you require more than 2 alarms, the VSI+16 has 16 alarm outputs. (see page 61 for additional info.)
There may be situations where you do not want cashiers or other employees to know what triggers an exception. In this case, the VSI+ provides a separate output that will send data to a remotely located serial printer. This feature is available on most registers that do not require a response from the VSI+. If you turn the on-screen display off and the output on and you have a remote serial printer hooked up to the VSI+, then, whenever an exception is reported, it is sent out to the serial printer only.
The printer will give you a hard copy printout of the questionable transaction with the time and date. The time and date must be generated by the serial printer or used in conjunction with the AVE RTC2RS real-time clock. With this hard copy printout of the exception report, you can then review the tape by going directly to that exception's time.
EXCEPTION REPORT
Programming Your Exception Report:
From the main programming menu, place the arrow in front of "EXCEPTION REPORT" and press and release "SET". This will take you to the following sub-menu:
EXCEPTION REPORT SUB-MENU:
EXCEPTION NO. 1
DISPLAY ON
OUTPUT ON
EXCEPTION STRING
NO SALE (Preprogrammed Default EX. 1)
OPERATOR NONE
RANGE
0000.00(-)0000.00
EXIT
EXCEPTION NO.
Choices: 1, 2, 3, 4, 5, 6, 7, 8, 9, 10, 11, 12, 13, 14, 15, 16, 17, 18, 19, 20, 21, 22, 23, and 24.
To select the Exception No. that you wish to program, place the
arrow in front of "EXCEPTION NO." and press and release "SET". The arrow will start flashing . Use the "UP" & "DOWN" buttons to sequence through the choices. Make your selection and press and release "SET". The arrow will stop flashing and you may continue to the next menu item.DISPLAY
Choices: ON or OFF
The "DISPLAY" item lets you control whether or not this particular exception is displayed on the video monitor. Please understand that unless you have the -EX option installed (hard alarm outputs) or you are using a remote serial printer, if you do not turn on the Exceptions display here, you will not have the on-screen flag and consequently, no record of the exception when it occurs.
To make your selection, place the arrow in front of "DISPLAY" and press and release "SET". The arrow will start flashing. Use the "UP" or "DOWN" buttons to toggle between "ON" or "OFF". Make your selection and press and release "SET"; the arrow will stop flashing and you may continue to the next menu item.
Application Note: If the display of the Exception is turned off here, the exception data will actually be erased from the screen. This feature can be used to generate what we refer to as "negative exceptions," allowing the removal of unwanted text from the screen. See "Negative Exceptions" on Pg. 32 of this manual.
The OUTPUT selection made here will override whatever choice you made in the COMMUNICATIONS submenu. A typical setup would be to turn off Output in the Communications submenu, then turn Output on for each Exception, so that only Exceptions are sent to a remote Serial Printer to provide a hard copy of the Exceptions with time and date generated by the printer. This data can also be sent out to a computer with the appropriate software, giving you the ability to analyze the data. You could use an auto answer modem and have the data sent to a central
office or even to you home. The Serial Device must have the same Baud Rate, Parity and Data Bits as the VSI+ in order for it to receive the data from the VSI+.The Pin out from the VSI+ DB-9 connector is:
PIN 3, Transmit Data, and PIN 5, Ground.
To make your selection, place the arrow in front of "OUTPUT" and press and release "SET". Use the "UP" and "DOWN" buttons to toggle between "ON" or "OFF". Display your selection and press and release "SET"; the arrow will stop flashing and you may continue to the next menu item.
PROGRAMMING NOTE:
The following sections define the Exception String, the Operator and the Range. The Exception String is programmed first, then the Range is defined and finally the Operator is selected.
The VSI+ looks at the Exception String first; if there is data that matches, it then checks to see if a range has been defined.
The VSI+ compares the data that is printed to video to the data entered in the Exception String. For example, if you are using a register that assigns alphanumeric tags to individual items, you can use these same tags to define very specific exceptions.
Fast Food restaurants typically have all items on individual keys along with separate clerk keys or cashier numbers. If this information prints to video, you can also use it to define your exception.
The Exception String can also be used without a defined range. An example of this would be to assign the word "VOID" as an exception. Because the VSI+ will only be looking for this Exception String, no range is needed.
However, the Exception string "VOID" could be further defined by assigning a Range. For example, all VOIDS over $10.00
You can also define a "Global" exception to flag all negative
Remember to enter your Exception string based on the way the data prints to video, including spaces!
transactions. An example of this using the Samsung ER-4715 would be the following exception to flag any transaction that contains a "-" or negative sign. This exception will cause any VOID, REFUND, MERCHANDISE RETURN, or PAID OUT to trigger an on-screen flag as long as the "-" sign was not used in any other type of transaction.The Exception looks like this: . . . _
This exception tells the VSI+ to look for any transaction that contains at least 3 decimals and a negative sign. Because the Samsung register places decimals and a negative sign within each of these transactions, you can now have one exception which globally flags all transactions that require taking money out of the register.
The WILDCARD symbol " " (a centered dot) excepts on any data in that position.
In the example above, the Samsung register prints each line of the transaction using the same format. The Department number, followed by a space, then a decimal, another space and so on until it prints the price. The VSI+ recognizes the spaces also, so be sure that your string matches the actual video display. Because this particular register formats all its departments the same, the WILDCARD could be used instead of the decimal.
PROGRAMMING THE "EXCEPTION STRING":
Place the arrow in front of "EXCEPTION STRING" and press and release "SET". The first position of the 20 character exception will become active by flashing. "NO SALE" is, by default, the Exception String for Exception No. 1. Program in your own exception string, or leave "NO SALE" for Exception No. 1, in which case you would go back to "EXCEPTION NO." and change to No. 2, then return to "EXCEPTION STRING" and begin programming.
Remember "SET" advances to the next character block. Pressing "DOWN" and"UP" at the same time enters the string into memory and returns to the sub-menu for further programming.
TIP: If you make a mistake and need to erase a character, pressing the UP and SET at the same time will change the character back to a blank space.
EXIT
Place the arrow here and press and release "SET" to return to the exception report submenu.
The "OPERATOR" determines the behavior of the "RANGE". Think of the OPERATOR in mathematical terms. Setting the correct range and specifying IN or OUT will make the OPERATOR perform Greater Than, Less Than, Equal To, IN the Range, or OUT of the RANGE calculations. With this version of the VSI+, you can define ranges for your Exceptions and have the VSI+ alarm when an Exception falls within the range's parameters or outside the range of the two numbers.
The choices are: IN, OUT, and NONE.
EQUAL TO EXAMPLE
Simplified example of an "IN" range: Suppose you wanted Exception #2 to flag all $10 sales on Register Department 1. This would be the settings for this Exception:
(For these examples, we are using the Samsung ER-4715 Electronic Cash Register):
Exception No. 2
Display ON
Output ON or OFF (depending on presence of serial printer)
Exception String 1 . . .
Range 0010.00<->0010.00
Operator IN
Now, anytime a $10 transaction is made on Department 1, you will get an on-screen flag. Any other dollar amount rung on this department will not trigger the on-screen flag. If this were an alphanumeric register, you would enter the alphanumeric title for the Department in the exception string. We will further explain the Exception String and its formatting later in this section.
OUT OF RANGE EXAMPLE
Simplified example of an "OUT" range.
For this example, we want Exception #3 to "FLAG" every transaction on Department 2 that is under 10 cents and over $100 dollars. This would be the settings for this Exception:
Exception No. 3
Display ON
Output ON or OFF (Depending on presence of serial printer).
Exception String 2 . . .
Range 0000.10 <-> 0099.99
Operator OUT
NOTE: If you were to change the Operator in this last example to "NONE", instead of "OUT", then any transaction that was rung on Department 2 would trigger the flag because now you have told the VSI+ that there is not an operator for the range to use (NONE); but, because the Exception string has been defined as "2 ...", the VSI+ will flag any transaction rung on Department #2.
IN RANGE EXAMPLE
For this example, we want exception 5 to flag all transactions between $50.00 & $100.00 on Department 3:
Exception No. 3
Display ON
Exception String 3 ...
Range 0049.99<->0099.99
Output ON or OFF
With this exception all sales between $50 and $100 dollars will be flagged.
GREATER THAN EXAMPLE
This example will show you how to program an exception to flag all sales in department 5 of $100 dollars or more.
Exception No. 2
Display ON
Output ON or OFF
Exception String 5...
Range 0000.01, 0099.99
Operator OUT
Now whenever anyone rings a sale of $100 or more on Department 5, the transaction will be flagged.
less than example
This example will show you how to program an exception to flag all sales in Department 6 of less than $100. 00:
Exception No. 4
Display ON
Output ON or OFF
Exception String 6
Range 0000.01,0099.99
Operator IN
Now, whenever anyone rings a sale of less than $100.00 on Dept. 5, the transaction will be flagged.
As you can see from these simplified examples, the Operator, Range and Exception String allow you to define very specific parameters for your Exception Report. On alphanumeric registers, you would have the ability, for example, to have all transactions by a particular cashier by name if your register prints the name on the receipt. The possibilities are virtually endless and are only limited by common sense and practical needs.
DEFINING THE OPERATOR
To make your selection, place the arrow in front of "OPERATOR" and press and release the "SET" button. The arrow will start flashing. Use the "UP" and "DOWN" buttons to make your selection. When your selection is displayed, press and release the "SET" button. The arrow will stop flashing and you may continue to the next menu item.
The range defines the limits of the operator. These are numeric only. As you can see from the previous examples, the range has two separate fields that are separated by a double-sided arrow. This format must be followed.
NAVIGATING THE EXCEPTION STRING
AND THE RANGE
Before you define your range, we need to explain how to navigate through the Range and Exception String using the front panel switches.
You will notice when you place the arrow in front of "RANGE" and press and release the "SET" button, the first "0" in the "Range" starts to flash. This means it is active and ready for programming. To change the value of this character, use the "UP" or "DOWN" buttons to move between 0-9. To move to the next block, press and release the "SET" button. This will advance the active block to the next block immediately to the left . This is how you move through the "RANGE" field.
While you are on an active block, pressing the "UP" and "SET" buttons simultaneously will return that block back to a blank, which is designated by a solid white box. You can follow this format to program your "RANGE". When you have finished and wish to set this range into the VSI+ memory, simultaneously press and release the "UP" and "DOWN" buttons. You can also use this if you make a mistake and want to start over, since there is not a backspace feature.
DEFINING THE RANGE
To define the range for the selected Exception, place the arrow in front of "RANGE" and press and release "SET". This will make the first position in the range field active. Follow the procedure outlined in the previous few paragraphs to enter your range.
EXITING THE RANGE FIELD
When you are ready to exit and continue on, simultaneously press and release the "UP" and "DOWN" buttons; this will set the range in the VSI+ memory and exit you back to the Exception Report Sub-Menu.
PROGRAMMING REMINDER
Use "UP" and "SET" together to erase an entry. Use "UP" and "DOWN" together to set the Range or Exception String into the VSI+ memory and return to the menu.
How to remove unwanted text from the screen using a VSI+ Version 11.XX
The VSI+ displays register data in a text block 9 lines by 20 characters wide for a total of 180 characters.
To remove unwanted messages from the register data you must first determine how the unwanted message prints to video.
For example: A typical message which scrolls on the customer display or appears on the video monitor.
WELCOME TO DAVES EXXON STATION. THANKS FOR SHOPPING.
To remove this message we will use a technique referred to as "negative exceptions".
Go into the main programming menu.
Access the "Exception Report" menu.
Exception 1 is defaulted to "NO SALE."
Go to Exception #2 (or the next available exception).
Turn its DISPLAY off.
Go to the EXCEPTION STRING and enter the words "WELCOME TO DAVES" exactly as they appeared on the screen, including spaces.
Now exit the exception string and go to the next Exception.
Turn its display off.
Go to the EXCEPTION STRING and enter the words "EXXON STATION."
Follow this procedure to remove the rest of the message.
Now every time the VSI+ "sees" these text strings, it will not display them, because the exception's display has been turned off.
NOTE: The VSI or VSI+ with the "EX" option installed will give you two hard alarm outputs to trigger other devices such as alarming VCRs, QUADs, enunciators, LEDs, switchers, etc.
The VSI+ 16 gives you 16 hard alarm outputs via a DB-25 connector.
Place the arrow in front of "ALARM OUTPUTS" and press and release "SET". You will be presented with the following sub-menu:
ALARM OUTPUTS SUB-MENU
ALARM NO.
ALARM TRIG
NORMAL STATE
ALM DURATION
FLAG TYPE
FLG DURATION
RTS TRIGGERED TEXT
EXIT
The ALARM OUTPUTS menu controls not only the formatting of the external alarms, but also the formatting of the on-screen flags assigned to individual exceptions.
1-16 are the choices.
With the EX-option installed, you have the ability to tie Alarm 1 and Alarm 2 to any of the programmed exceptions to trigger an external device. If you purchased the VSI+16, you have up to 16 alarm outputs that may be used with any of the user programmed exceptions. NOTE: The hard alarm outputs on the VSI+16 can switch up to 12VDC @ 100mA.
To select the Alarm Number that you want to program, place the arrow in front of "ALARM NO." and press and release "SET". The arrow will start flashing . By using the "UP" & "DOWN" buttons, toggle through and make your selection. When you have made your selection, press and release "SET"; the arrow will become solid and you may continue programming your VSI+.
An ALARM TRIGGER is the source of activity programmed to activate a certain alarm.
The Alarm Trigger tells the VSI+ what exception to use to trigger the alarming device or the on-screen flag.
The choices are:
Exceptions 1, 2, 3, 4, 5, 6, 7, 8, 9, 10, 11, 12, 13, 14, 15, 16, 17, 18, 19, 20, 21, 22, 23, & 24: (alarms when data is received that matches what you have set in these exception strings).
Exceptions 1-12: alarms when data is received that matches any data set in Exception 1-12.
Exceptions 13-24: alarms when data is received that matches any data set in Exception 13-24.
Exceptions 1-24: alarms when data is received that matches any data set in Exception.
RTS: External alarm input. The VSI+ has 1 alarm input, if you are not using the handshaking function. A contact closure to ground on pin 7 (pin 5 is ground) will trigger this alarm. Coupled with the RTS Triggered text, you can now display a 20 character message from an external alarm input.
RTS Application Note: The RTS alarm input can be connected to a timer on the drawer of a cash register to alarm and send the message "DRAWER OPEN" to the screen if the drawer is open too long.
None: Sends no alarming data.
NOTE:
In order for you to program an exception to trigger an external alarm number 1 or 2, you must have the VSI+ with the EX-option installed and you must add wires to the DB-9 connector on the VSI+, or you can order the EX-Triport that plugs in with no soldering involved. The EX Option employs an open collector transistor to activate the external alarms.
Pin 1 on the DB-9 is Alarm 1, and Pin 9 is Alarm 2. Pin 5 on the DB-9 is ground.
In order to program 16 alarms you need to have the new VSI+16. Refer to the VSI+16 DB-25 connector pin out on page 58 of this manual.
To select the Alarm Trigger that you want to program, place the arrow in front of "ALM TRG" and press and release "SET". The arrow will start flashing . By using the "UP" & "DOWN" buttons, toggle through and make your selection. When you have made your selection, press and release "SET". The arrow will become solid and you may continue programming your VSI+.
There are two choices: NO (normally open) or NC (normal closed). These selections determine whether the optional EX alarm outputs will act as a normally open switch or a normally closed switch.
To select the Normal State that you want to program, place the arrow in front of "NORMAL STATE" and press and release "SET". The arrow will start flashing . By using the "DOWN" & "UP" buttons, toggle through and make your selection. When you have made your selection, press and release "SET"; the arrow will become solid and you may continue programming your VSI+.
This is the amount of time in seconds that the alarm will remain activated once it is triggered. The selections for alarm duration are: PULSE, 6, 12, 20, 30, 60, 120, 180, and 300 seconds. (PULSE sends a 200mS alarm pulse to the alarm device.)
To select the amount of time in seconds that you want to program the alarm duration, place the arrow in front of "ALM DURATION" and press and release "SET". The arrow will start flashing . By using the "DOWN" & "UP" buttons, toggle through and make your selection. When you have made your selection, press and release "SET"; the arrow will become solid and you may continue programming your VSI+.
This feature allows you to insert a visual alarm flag on each exception that you program to aid in the review of the video tape. This flag can appear as an asterisk "*" , a flashing asterisk, reverse text, or flashing reverse text.
To make your selection place the arrow in front of " FLAG TYPE" and press and release "SET". The arrow will start flashing . By using the "DOWN" or "UP" buttons, toggle between the choices and make your selection. When you have made your selection, press and release "SET"; the arrow will become solid and you may continue programming your VSI+
This is the amount of time in seconds that the on-screen FLAG, either the Asterisk or the Reverse mode, will remain activated once it is triggered.
NOTE: Flag duration is independent of the EX option Alarm Duration. Flag Duration is the amount of time the On-Screen flag will remain on after activation, while Alarm Duration (available only with the EX option installed) is the amount of time that the HARD-WIRE Alarm outputs remains activated after it is triggered.
The selections for "FLG DURATION" are:
6, 12, 30, 60, 120, 180, and 300 seconds.
To select the amount of time in seconds that you want to program for the flag duration, place the arrow in front of "FLG DURATION" and press and release "SET". The arrow will start flashing . By using the "DOWN" & "UP" buttons, toggle through and make your selection. After you have made your selection, press and release "SET"; the arrow will become solid and you may continue programming your VSI+.
RTS TRIGGERED TEXT (Version 11.00R8 and later)
This allows you to send a 20 character text message to the screen upon an external alarm input.
EXIT
This will return you to the main menu of the VSI+.
The TEST/DEMO MODE provides you with several ways to test the VSI+ and show its capabilities as a Cash Register interface.
To access this section, place the arrow in front of "TEST/DEMO MODE" and press and release "SET"; you will be presented with the following sub-menu:
TEST/DEMO MODE SUB-MENU
PORT 1 TEXT
REGISTER DEMO
VERSION ID
LOGO
EXIT
PORT 1 TEST
Port 1 is the serial data from pins 2 & 3 of the DB-9.
Place the arrow in front of "PORT 1 TEST" and press and release "SET". This will take you to the following PORT 1 TEST sub-menu:
PORT 1 TEST SUB-MENU
RECEIVE (RX) TEST
TRANSMIT (TX) TEST
RX/TX TEST
BAUD RATE SCAN
EXIT
RECEIVE (RX) TEST checks if the VSI+ is receiving data from the register.
To proceed with this test, place the arrow in front of "RECEIVE (RX) TEST" and press and release "SET". You will be presented with the following sub-menu:
RECEIVE (RX) TEXT SUB-MENU
RX BAUD RATE: AUTO
TX BAUD RATE: 2400
PARITY: NONE
DATA BIT: 8
HANDSHAKING: ON
RECEIVING:
BAUD RATE DETECTION.
NOTE: In any of these tests, you can pause the data scrolling by holding down either the "UP" or "DOWN" buttons.
The VSI+ is now waiting for data from the register. Enter a transaction. If the VSI+ is receiving data from the register, it will appear in three separate lines, scrolling from right to left across the bottom of the on-screen display. The first line is the transaction information. The second and third represent the HEX equivalent of the data in the first line.
0 Register ASCII Data
3
0
If you perform this test and do not receive any data, then check all connections to the VSI+, Register, and any additional interfaces.
TRANSMIT (TX) TEST
In the TRANSMIT TEST, the VSI+ sends a predefined ASCII pattern to further test the hardwire connections of the system. To proceed with this test, place the arrow in front of "TRANSMIT (TX) TEST" and press and release "SET". You will be presented with the following sub-menu:
TRANSMIT (TX) TEXT SUB-MENU
RX BAUD RATE: AUTO
TX BAUD RATE: 2400
PARITY: NONE
DATA BIT: 8
HANDSHAKING: ON
TRANSMITTING: BAUD RATE DETECTION.
RX/TX TEST
In the RX/TX TEST, the VSI+ echoes whatever it receives to further test the hardwire connections of the system. To proceed with this test, place the arrow in front of "RX/TX TEST" and
Hex Code
press and release "SET". You will be presented with the following sub-menu:RX/TX TEXT SUB-MENU
RX BAUD RATE: AUTO
TX BAUD RATE: 2400
PARITY: NONE
DATA BIT: 8
HANDSHAKING: OFF
ECHOING: BAUD RATE DETECTION
BAUD RATE SCAN
There may be times when the Baud Rate cannot be detected on start-up. In the BAUD RATE SCAN test, you can scan for your register's Baud Rate. To proceed with this test, place the arrow in front of "BAUD RATE SCAN" and press and release "SET". You will be presented with the following sub-menu:
BAUD RATE SCAN SUB-MENU
RX BAUD RATE: AUTO
TX BAUD RATE: 2400
PARITY: NONE
DATA BIT: 8
HANDSHAKING: OFF
BAUDRATE SCAN:
BAUD RATE DETECTION
Enter a transaction; the VSI+ will scan for the Baud Rate and display it where "AUTO" is on the menu.
To return to the sub-menu, press and release "SET".
EXIT
Place the arrow in front of "EXIT" to return to the "RS232 TEST" sub-menu.
This demonstration simulates transaction data from a register. This is used to demonstrate the VSI+ capabilities using just a monitor and camera without having a register hooked up. When the demo mode is active the VSI+ thinks the data is actually coming from a real register. You can use this demo data to
configure exceptions and alarms to be fully functional for a complete customer demonstration.To access this demonstration, place the arrow in front of REGISTER DEMO and press and release "SET". The demo will start after a few seconds. To exit this demo, press and release "RESET".
LOGO
This demo displays the AVE logo cycling through several sizes.
To access this demonstration, place the arrow in front of LOGO and press and release "SET". The demo will start after a few seconds.
To exit this demo, press and release "RESET".
This feature lets you UPLOAD or DOWNLOAD data between VSI+s or a VSI+ and a PC. This feature is especially helpful on multi-interface installations. You can program one VSI+, then download the data to another VSI+ with the DOWN/UP load feature, using a data transfer cable.
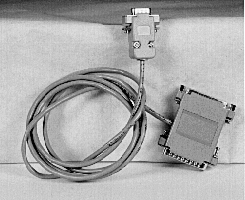
The cable is made up of two male DB-9 connectors and the pin out is:
DOWN/UP LOAD DATA CABLE
PIN 2-------------- PIN 3
PIN 3-------------- PIN 2
PIN 5-------------- PIN 5
UPLOAD/DOWN LOAD CABLE DIAGRAM
Note: The Down/Upload feature can only be used on VSIs with the same software Revision level. For example, V11.00R7 cannot down or upload to V11.00R8
DOWN/UP LOADING VSI+ TO VSI+
To insure that the data upload or download is accomplished, you need to access the programming menu, so each VSI+ needs a video input and a monitor. The optimum way to perform DOWN/UP LOADS would be to have a system set up with two separate cameras and monitors and the programmed VSI+ with the data cable attached. The VSI+ programming data is stored internally on an EEPROM. This would allow you to program one register
Down/Uploads can only occur between VSI+s with the same version number.
on site and bring the programmed VSI+ back to the shop or office and program additional VSI+s quickly.
We realize this may not always be possible to do, and that there may be a need for field programming. The only problem with field Down/Up loading is the need to access the programming menu of each VSI+. The use of a portable monitor and the following diagram will let you perform the Down/Upload in the field. For this, you will need a short BNC to BNC cable approximately a foot long, the data cable and a monitor that can be used next to the VSI+(see next page for basic hook-up).
The programmed VSI+ will UPLOAD data to the unprogrammed VSI+. In the configuration on the following page, you can get the programming menus from both VSI+s on the screen at the same time. Let's use the front panel shortcut to position the text block from the PROGRAMMED VSI+ on the left side of the screen. To do this, press and hold down the "UP" button, then press and release "RESET" and release "UP".
Now, by using the "UP" and "DOWN" buttons, you can move the display side to side on the screen. Move the text block as far to the left as you can and press "RESET" to exit.
Now let's move the display to the top of the screen. Hold down the "SET" button and press and release "RESET", then release "SET". Now the "UP" and "DOWN" buttons will move the display up and down on the screen. Move the display to the top of the screen. When you have it in the correct position, press "RESET" to exit.
Go to the other VSI+ and this time follow the same instructions except we want this display on the right side of the screen.
After you have both displays positioned properly, we need to bring up both programming menus.
Lets bring up the PROGRAMMED VSI+ first.
To do this, simultaneously press and hold "UP" and "DOWN" and press and release "RESET" , then release "UP" and "DOWN". This will bring up the main menu and it should be on the left half of the screen. Now go to the other VSI+ and do the same thing. You should now have both programming menus side by side.
NOTE: Depending on the size of the monitor you are using, these two menus may overlap, but that is okay and should not be a problem.
To proceed with the DOWNLOAD/UPLOAD, we will configure the UNPROGRAMMED VSI+ first. To do this, place the arrow in front of "DWN/UP LOAD SETUP" on the main menu on the right side of the screen. Press and release "SET". This will take you to the following sub-menu:
DOWNLOAD SETUP
UPLOAD SETUP
EXIT
The arrow should be pointing to "DOWNLOAD SETUP". Press and release "SET".
You will see the prompt "DOWNLOADING ...". This VSI+ is now waiting to receive data from the PROGRAMMED VSI+.
Now go to the menu of the PROGRAMMED VSI+ and follow the instructions above to get to the "DOWN/UP LOAD SETUP". Press and release the "SET" button to go to the sub-menu. Now place the arrow in front of "UPLOAD SETUP".
We are now ready to perform the data transfer. Press and release "SET". The data transfer will start and you will have a screen count down of the status that reads:
Programmed VSI Unprogrammed VSI
UPLOADING ...1 DOWNLOADING ...1
The count will end at 99.
When this prompt clears the screen, the data transfer is complete.
Press Reset to exit this menu on both VSIs.
Now go to the main programming menu of the previously unprogrammed VSI+ on the right side of the screen. Enter the
EXCEPTIONS menu. You should see your exceptions and other programmed data just as they were on the original programmed VSI+.Follow this same procedure to program all the VSI+s in your system.
For locations or companies with a large number of interfaces, we strongly advise that you keep one programmed VSI+ as a master and a backup to insure your system integrity. This will also aid in reprogramming any changes and protect against any catastrophic events.
UPLOADING/DOWNLOADING VIA A PC
You can use a Laptop PC and AVE's IC or equivalent communications program to store data from a VSI+ to a file. This file can then be uploaded to other VSI+ units with the same software revision level. Use 4800 baud for the PC's baudrate.
This section contains a Problem Solving Guide and information regarding AVE's additional interfaces, cables, connectors, tips, and special applications.
Before attempting to install your system, we highly encourage you to get your customer to demonstrate to you that their register is operating properly.
AVE's CR boards expect the register to work within certain specifications. Always check the register's journal printer tape to insure that there are no characters or dots missing. Check for proper alignment of the receipt and journal tape. Any of these factors can adversely effect the performance of the VSI+.
No data on screen.
1. Press the reset button on the VSI+ front panel.
2. Incorrect register selected in the Register Select Menu.
3. Data cable is miswired.
4. Data cable is too long or did not use shielded cable.
5. May be connected to the wrong port.
Additional Interfaces- CR boards
1. Check that the board is seated properly in the register.
2. Check jumper settings on the CR board if applicable.
3. On CR-700, 800 and 900 series boards, make sure the 2 pin data cable is plugged in correctly.
4. On CR-220 series board, make sure the 2 pin data cable is plugged in correctly.
Additional Interfaces-N2RS, NCR2RS, DTS2RS,B2RS ETC..
1. Check the cable to the register.
2. If VSI was working and stopped, power cycle the system. Turn off the register, unplug the power to the N2RS, unplug the power to the VSI. Now power up the system, plug in the VSI & the N2RS Turn on the register and do a transaction. The data should reappear.
3. Check the cable between the VSI and the N2RS.
No video on monitor.
1. VSI transformer not plugged in, or is malfunctioning.
2. Video In/Out connectors reversed, or BNC connector is not correctly wired.
3. No video input signal.
4. Bad video cable or connector.
5. Camera Iris is closed.
6. Other video device in system is off or malfunctioning.
Characters Jitter, Jump or Skew
Note: The VSI requires 1V p-p +/- 20 percent, terminated @ 75 ohms.
1. Darken the gray scale of the characters.
2. Video Input level less than 1VP-P - use an amplifier to get the proper level.
3. Poor input sync signals - too many AC coupled amplifiers in the video input signal.
4. Noisy or poor quality video source- Replace with better source.
5. Check for double termination.
6. Video level too high; VSI+ will clip video.
7. Text is too close to the edge of the screen. Try repositioning the text.
8. Too much light in the video picture may cause character distortion. Reposition the camera or reduce the amount of light to which the camera view is exposed.
Funny characters or garbage on screen.
1. Power disconnected for too long and memory is lost.
2. Lightning strike , power line noise or power surge.
3. CR boards- make sure data cable is plugged in correctly.
4. Ground and Data wires are reversed. Verify correct DB-9 cable wiring.
Master reset
How to do a Master Reset on the VSI+:
Press and hold in simultaneously the DOWN, UP and SET buttons. While holding those three buttons in, press and release the RESET button and then release the other three. This will produce the message BOOT UNIT WAIT.... and then our copyright notice. This copyright message will disappear and the message BAUDRATE DETECT will appear. If you are connected to a register which requires specific software, then go into the REGISTER SELECT menu and chose your register. Then have someone perform a transaction on the register.
Caution: Performing a master reset will set the VSI+ back to its factory defaults and erase all programming including Exceptions. If you have programmed exceptions, we suggest you go to the Exceptions Report and write down the exceptions.
Commonly Asked Questions Regarding Cash Register Interfacing.
My customer is changing registers; will the VSI they have work on the new register?
This is a tricky one. We interface to over 400 different registers and as a result, there are several versions of software needed to work with all these different systems. The probability the VSI will work with a new system is relatively high, especially if it's Version 11 based. The chances any additional boards or boxes will work is lower, unless your customer is staying with the same manufacturer and within the same register series.
Call AVE's Product Support Specialists for additional help along these lines.
If I install your interface board into a new register, will it void my customer's warranty?
Probably. This is why we strongly reccomend you enlist the aid of your customer's register dealer, especially on new registers and/or if you're not familiar with cash register interfacing. The dealer may charge your customer for a service call but you won't have the headache. If you're connecting to an external RS-232 port, then this generally does not void the warranty.
I installed a VSI+ and the On-screen Text jumps or jitters.
Our VSI+ text inserter requires the input video signal to be 1V P-P +/-20%, terminated @ 75ohms. If this voltage varies either too high or too low, then the VSI has trouble syncing the text to the video.
There are a couple of things you can try to help settle the text down. Change the gray scale level of the text block from the whitest level to one of the slightly lower gray levels. Changing the size of the text block may help. Sometimes moving the text block away from the edge of the screen may help settle the text down too.
If these don't seem to have an effect then try using a distribution amp like AVE's VDA-601 to properly adjust the video level.
If the camera you're using has an auto iris lens, try adjusting the iris to average and then reduce or increase the level.
Triports are typically used to passively tap data from a serial device. The Triports have three connectors, either 2-DB-25s back to back or 2-DB-9s and an additional DB-9 male which connects to the VSI+. There are several types available depending on the type of register, ATM or computer. Following are the cable pin-outs for Triports and the N2RS, B2RS, and the NCR2RS cables available from AVE.
Dresser Wayne Triport
DB-9M
Cable length is 3 ft.
3 25 5
Shield Shield
DB-9M
DB-9F
Generic Triport
DB-25M
Cable length is 3 ft.
3 White 27 Black 5
DB-9M
DB-25F
MEMS 5 & GILBARCO Triport
DB-25M
Cable length is 3 ft.
2 Red 27 Black 5
DB-9M
DB-25F
MICROMAX Triport
DB-25M
Cable length is 3 ft.
3 White 27 Black 5
DB-9M
DB-25F
N2RS to VSI Interconnect Cable
This cable connects the N2RS, B2RS, and the NCR2RS to the VSI+.
2 35 1
DB-9M
DB-9F
ICL Triport
DB-15 M
3 Data 27 Gnd 5
DB-9 M
DB-15 F
Gilbarco PC G Site Triport
RJ-45 to DB-9 Adapter
2 2 Data
4 5 Gnd
Triports and Adapter Cables continued
Suntronics RJ-45 Triport
RJ-45 to DB-9 Adapter
5 2 Data
6 5 Gnd
CRS 1, 2, or 3,000 Triport- Tap or Emulation Cable
Tap Emulate
(DB-9 Triport to DB-9 VSI+) (DB-9 Triport to DB-9 VSI+)
3 2 TXD 3 2 TXD
7 5 Gnd 4 3 RXD
6 7 CTS-RTS
7 5 Gnd
Samsung DB-9 Triport- Tap or Emulation Cable
Tap Emulate
(DB-9 Triport to DB-9 VSI+) (DB-9 Triport to DB-9 VSI+)
3 2 Data 2 3 Data
5 5 Gnd 5 5 Gnd
Shield Shield 4
6
8
9
Pin Outs for Standard Connectors that can be used in conjunction with the VSI+
Standard Connectors continued
Standard Connectors continued
RTC2RS-Time & Date StampUse AVE's RTC2RS to add Time and Date to an Exception Report going to a serial printer. In this example, we are using the AVE IMP-24 serial printer.
RTC2RS Cable Diagram

The Baudrate of the RTC2RS must be set to match the printer. The Transmit Baudrate of the VSI+ must be set to match the RTC2RS and the printer.The 5 position dipswitch is used to set the RTC2RS Baudrate.
Baudrate SW1 SW2
1200 OFF OFF
2400 ON OFF
4800 OFF ON
9600 ON ON
Setting up the VSI+ to send RTS triggered text and exceptions only to the AVE IMP-24 serial printer or Equivalent.
To send out RTS triggered text without an RTS Alarm Input the VSI+ must have the EX Option installed and pin 7 of the DB-9 connector, which plugs into the rear of the VSI+, must be connected to pin 1. This allows an alarm output to trigger the RTS Alarm Input of the VSI+by itself, thus enabling the trigger text to output to a serial device.
In the Communications Menu, Set the TX Baudrate to 2400
(or whatever the printer's baudrate is).
Now go down to OUTPUT and turn it Off. (If OUTPUT is ON all transactions will print to the printer; in this example we just want the exceptions with the RTS triggered text to go to the printer.
Exit this menu and go to the Alarm Output menu.
In the Alarm Output Menu, set the Alarm Trigger for Alarm 1 to EX 1-12 or 1-24
Configure Alarm 1's other parameters to your needs.
Go to Alarm 16 and set its Alarm trigger to RTS.
Set the alarm duration to PULSE.
(if you wanted the RTS triggered text to appear on-screen, you would set the Alarm Duration to something other than PULSE.)
Set the RTS triggered text string to whatever you want sent out along with each exception.
In the Exception Menu:
Make sure each Exception's Display and Output are turned on.
PC Based POS Systems
There are a myriad of PC based systems out there which do not appear on the AVE Cash Register Compatibility list. Although your customer's P.C. based system may not be on the list, there may still be a way for us to interface to it.
Find out the following info:
Does the system use a stand alone receipt printer? If it does, find out the manufacturer and model number and most importantly, whether it is a SERIAL or PARALLEL printer.
If it's a serial printer, we have a good chance of interfacing to it using the VSI+ and a TRIPORT.
If it's parallel, it will require a VSI+, a parallel to serial converter and a cable. We have two models of parallel to serial converters and which one to use is determined by the throughput of the data and the size of the printer's internal buffer. Also find out the connector type for the printer- whether it's a DB-9, DB-25, or Centronics type connector and the pin-out of the printer.
The next two pages show AVE's two parallel to serial converters used for some registers and most PC based systems.
Call AVE's Product Support Department for more information.
PS-100 Parallel To Serial Converter
For Direct Connection to a PC-based System without a Remote Printer; the VSI+ will emulate a printer.
The PS-100 connects to the PC System via a Parallel to Centronics cable and a DB-25 to DB-9 cable is required for attachment of the PS-100 to theVSI+.
Make a cable from this DB-25 to the DB-9 which plugs into the VSI+. Use the supplied connectors using the following pin out, and 2 conductor, shielded cable. Limit the length to 20 feet.DB-25 PS-100 DB-9 VSI+
3----------------------------------2
7----------------------------------5
68
20
P2RS - High Speed Parallel to Serial Converter
The P2RS is used to interface the VSI+ with a PC Based System that is utilizing an external printer. It will connect at either the PC or Register or at the printer. AVE provides the necessary cable for either installation: the P2RS DB-25 cable for connecting to the PC's parallel port, or the P2RS Centronics cable for connecting to the printer's Centronics port.
The P2RS connects to the VSI+ with a short DB-9 to DB-9 cable. The Pinout for this cable is:
P2RS DB-9F VSI+ DB-9M
3 2
1 5
connects to theprinter cable
connects to theprinter port
Use this cable to connect to the computer's parallel port
Use this cable for connecting to the printer's Centronics port.
connects to thecomputer port
connects tothe P2RS
connects to theprinter cable
With either cable, the P2RS will read the data sent from the computer to the printer and convert it to the RS-232 format necessary for the VSI+ to overlay it onto video.
connects tothe P2RS
EX Option- Hard Alarm Output
The EX option provides two open collector transistor alarm outputs to trigger alarming devices. Upon an Exception, a VSI+ with the EX option can be programmed to trigger a VCR to go to its fastest record time, have a Quad go full screen, home a switcher, trigger a preprogrammed PTZ, or provide visual or audible alarms.
The EX option provides 2 alarm outputs and the VSI+16 provides 16 alarm outputs.
Following are some basic circuit designs to take advantage of the EX option board.
VSI+ Version 11.XX Programming Menus
The VSI+ can interface to over 400 Cash Registers and other devices, and as a result, there are several versions of the VSI+ software to accomodate all of these. Listed here are the various versions and their menu differences. Typically, the changes occur in the REGISTER SELECT Menu. If there are other differences they are listed as well.
LAY CHOICES: ON OR OFF DISPLAY CHOICES: ON OR OFF EXITCOMMUNICATION
RX BAUD RATE
CHOICES: AUTO, 150, 300,
600, 1200, 2400, 4800, 9600,19200
TX BAUD RATE CHOICES: AUTO, 150, 300,
600, 1200, 2400, 4800, 9600,19200 PARITY CHOICES: ODD, EVEN, NONE DATA BITS CHOICES: 7 OR 8
HANDSHAKE CHOICES: ON OR OFF AUTO LINEFEED CHOICES: ON OR OFF
OUTPUT
CHOICES: ON OR OFF
EXIT
EXCEPTION REPORT
EXCEPTION NUMBER
CHOICES: 1-24
DISPLAY
CHOICES: ON OR OFF
OUTPUT
CHOICES: ON OR OFF
EXCEPTION STRING
1 LINE X 20 CHARAC TER
RANGE
2 NUMERIC FIELDS
OPERATOR
CHOICES: IN, OUT, NONE
EXIT
11.00R9 MENU
REGISTER SELECT
GENERIC
DATA CHECKER
DRESSER WAYNE
GASBOY
DEVICE ADDRESS
CHOICES:
00-16 OR ANY EXIT
GILBARCOTCRG/2
TCR15G (OLD FMT)
TCR15G (NEW FMT)
MEMS-5MICROMAX
NCR 2113, 3000
EXIT
SCREEN SETUP CHARACTER SIZE CHOICES 10 BORDER/GRAYSCALE CHOICES 10 LEVELS HORIZONTAL POSITION ANYWHERE VERTICAL POSITION ANYWHERE EXIT
TEXT DISPLAY
SCREEN BLANK CHOICES NONE, 6, 12 20, 30, 60, 120, 180, 300 DISPLAY LINES CHOICES:1-9 ONSCREEN TITLER TITLER CHOICES: ON OR OFF
TITLE
1 LINE X 20 CHARACTERS EXIT TRUNCATE CHOICES: ON OR OFF LINE COMPRESS CHOICES: ON OR OFF LEFT JUSTIFIED CHOICES: ON OR OFF SCROLL DE
ALARM OUTPUTS ALARM NUMBERCHOICES 1-16
(VSI+EX-2, VSI+16, 16)
ALARM TRIGGER
CHOICES: EXCP'S 1-12, 13- 24, ANY DATA - EX'S 1, 2, 3, 4....24
NORMAL STATE
CHOICES: N/O, N/C
ALARM DURATION
CHOICES: IN SECONDS; 6, 12, 20, 30 60, 120, 180, 300, PULSE
FLAG TYPE
CHOICES: *, FLASHING *
REVERSE, REVERSE FLASH
FLAG DURATION
CHOICES: SAME AS ALARM
DURATION
RTS TRIGGERED TEXT
20 CHARACTERS
EXIT
TEST/DEMO MODE
PORT 1 TEST
RECEIVE TEST
BAUDRATE
PARITY
DATA BIT
HANDSHAKING
RECEIVING
TRANSMIT TEST
BAUDRATE
PARITY
DATA BIT
HANDSHAKING
TRANSMITTING
RX/TX TEST
BAUDRATE
PARITY
DATA BIT
HANDSHAKING
ECHOING
BAUDRATE SCAN
BAUDRATE
PARITY
DATA BIT
HANDSHAKING
BAUDRATE SCAN
BAUDRATE DETECTION
REGISTER DEMO
VERSION ID
LOGO
DWN/UP LOAD SETUP
DOWNLOAD SETUP
UPLOAD SETUP
EXIT
11.01R7 MENU
REGISTER SELECT P-PIM
RADAR GUN
RG2RS
GENESIS
HUNTER
MICROS
DEVICE
PRINTER, VIDEO
DEVICE ADDRESS
CHOICES: ANY OR 01-15
MODE
TAP OR EMULATE
CHOICES: TAP OR ACK
EXIT
AD4323
EXIT
11.02R1A MENU
REGISTER SELECT
VSI-DRS
SHARP
3100, 3250, 3550
A550
EXIT
TEST/DEMO MODE
PORT 1 TEST
PORT A TEST
11.03R8 MENU
REGISTER SELECT
ALL OTHERS
VSI-DRS
SHARP
3100, 3250, 3550
R550
SICOM
FASFAX
DEVICE ADDRESS
CHOICES: 01-1
DISPLAY
PRINTER
KEYBOARD LCD
EXIT
IBM3151 TERMINAL
DISPLAY
MIXED
JOURNAL
RECEIPT
EXIT
VERIFONE
JOURNAL TAPPING
RECEIPT TAPPING
JOURNAL EMULATE
RECEIPT EMULATE
EXIT
11.04R3 MENU
REGISTER SELECT
IBM-POS ND
IBM-POS GESA
DISP ITEM SCAN CHOICES: ON OR OFF
EXIT IBM-POS GRSA
DISP ITEM SCAN
CHOICES: ON OR OFF
EXIT
EXIT
TEST/DEMO MODE
PORT 1 TEST
PORT A TEST
11.05R1 MENU
ATM SELECT
GENERIC SDLC
MDS1062
EXIT
TEST/DEMO MODE PORT 1 TEST
PORT A TEST
PORT B TEST
11.06R2 MENU (VSI+IBM)
DEVICE ADDRESS
MODEL 2 SLIP
MODEL 2 JOURNAL
MODEL 3 SLIP
MODEL 3 JOURNAL
EXIT
11.08R3 MENU
REGISTER SELECT
TCI
DEVICE ADDRESS
CHOICES:
PRGRMMBLE 3 DIGITS
EXIT
NORAND
TITLE DISPLAY
CHOICES: OFF OR ON
CONSOLE ID
CHOICES: ANY, 1-8
WORKING MODE
CHOICES TAP OR ACK
EXIT
PANASONIC
MODEL
CHOICES: 6000, 700
WORKING MODE
CHOICES: TAP OR ACK
EXIT
EXIT
11.14R1 MENU
GPS SETUP IFORMAT CHOICES
NMEA0183 OR AIR
ITIME ON OR OFF DATE ON OR OFF
SPEED ON OR OFF
DIRECTION ON OR OFF
EXIT
Use this page to make a written record of Exception Strings.
| EX.NO | DISPLAY | OUTPUT | EXCEPTION STRING | RANGE | OPERATOR |
| 1 | ON OFF | ON OFF | IN OUT NONE | ||
| 2 | ON OFF | ON OFF | IN OUT NONE | ||
| 3 | ON OFF | ON OFF | IN OUT NONE | ||
| 4 | ON OFF | ON OFF | IN OUT NONE | ||
| 5 | ON OFF | ON OFF | IN OUT NONE | ||
| 6 | ON OFF | ON OFF | IN OUT NONE | ||
| 7 | ON OFF | ON OFF | IN OUT NONE | ||
| 8 | ON OFF | ON OFF | IN OUT NONE | ||
| 9 | ON OFF | ON OFF | IN OUT NONE | ||
| 10 | ON OFF | ON OFF | IN OUT NONE | ||
| 11 | ON OFF | ON OFF | IN OUT NONE | ||
| 12 | ON OFF | ON OFF | IN OUT NONE | ||
| 13 | ON OFF | ON OFF | IN OUT NONE | ||
| 14 | ON OFF | ON OFF | IN OUT NONE | ||
| 15 | ON OFF | ON OFF | IN OUT NONE | ||
| 16 | ON OFF | ON OFF | IN OUT NONE | ||
| 17 | ON OFF | ON OFF | IN OUT NONE | ||
| 18 | ON OFF | ON OFF | IN OUT NONE | ||
| 19 | ON OFF | ON OFF | IN OUT NONE | ||
| 20 | ON OFF | ON OFF | IN OUT NONE | ||
| 21 | ON OFF | ON OFF | IN OUT NONE | ||
| 22 | ON OFF | ON OFF | IN OUT NONE | ||
| 23 | ON OFF | ON OFF | IN OUT NONE | ||
| 24 | ON OFF | ON OFF | IN OUT NONE |
CR BOARD JUMPER SETTINGS
| MANUFACTURER | MODEL# | CR BOARD TYPE | J1 | J2 | J3 |
| CASIO | TK-710 | CR-802 | |||
| CASIO | 7K-1000 | CR-802 | X | ||
| CASIO | TK-1100 | CR-802 | X | ||
| CASIO | TK-3115 | CR-802 | X | ||
| CASIO | 3404 | CR-910 | |||
| CASIO | 3408 | CR-910 | |||
| CASIO | 4404 | CR-910 | |||
| CASIO | 4420 | CR-910 | |||
| JCM | 2200 | CR-802 | |||
| OMRON | RS-2010 | CR-802 | |||
| OMRON | RS-12 | CR-802 | |||
| OMRON | RS-14 | CR-910 | |||
| ROYAL | CMS-8160 | LP-701 | X | ||
| SANYO | 305 | CR-802 | |||
| SANYO | 325 | CR-802 | |||
| SANYO | 335 | CR-802 | |||
| SANYO | 360 | CR-802 | |||
| SANYO | 365 | CR-802 | |||
| SANYO | 370 | CR-802 | |||
| SANYO | 375 | CR-802 | |||
| SANYO | 460 | CR-802 | |||
| SANYO | 470 | CR-802 | |||
| SANYO | 500 | CR-802 | |||
| SANYO | 505 | CR-802 | |||
| SANYO | 510 | CR-802 | |||
| SANYO | 515 | CR-802 | |||
| SANYO | 520 | CR-802 | |||
| SANYO | 570 | CR-802 | |||
| SANYO | 550 | CR-910 | |||
| SANYO | 560 | CR-910 | X | ||
| SHARP | ER-2710 | CR-802 | |||
| SHARP | 1911 | CR-802 | |||
| SHARP | 1911S | CR-802 | |||
| SHARP | 1921 | CR-802 | |||
| SHARP | 1970 | CR-802 | |||
| SHARP | 2385 | CR-802 | X | ||
| SHARP | 2395 | CR-802 | X | ||
| SHARP | 2385S | CR-802 | X | ||
| SHARP | 2395S | CR-802 | X | ||
| SHARP | 2380 | CR-802 | X | X | |
| SHARP | 2381 | CR-802 | X | X | |
| SHARP | 2390 | CR-802 | X | X | |
| SHARP | 2391 | CR-802 | X | X | |
| SHARP | 1920 | CR-802 | X | ||
| SHARP | 2386 | CR-802 | X | X | |
| SHARP | XE2055 | CR-802 | X | X | |
| SHARP | 2590S | CR-910 | |||
| SHARP | 2540 | CR-910 | X | ||
| SHARP | 2905 | CR-910 | X | ||
| SHARP | 2908 | CR-910 | X | ||
| SHARP | 2910 | CR-910 | X | X | |
| SWEDA | 2810 | CR-910 | |||
| SWEDA | 2820 | CR-910 | X | ||
| TEC | FS-160 | LP-704 | |||
| TEC | MA-216 | LP-701 | |||
| TEKNICA | G-220 | CR-802 | |||
| TEKNICA | G-2700 | CR-910 | |||
| TEKNICA | G-4000 | CR-910 | X | ||
| TEKNICA | G-2800 | CR-910 | X |
AVE Thailand Co., LTD.
147 Soi OnNut44, (Sampheenong Villa), Sukhumvit 77Rd., Suanluang, Suanluang, Bangkok 10250 Thailand.
Tel: +662 331 9285 ,+662 331 9364 and +662 742 0221
Fax: +662 331 9365 Mobile: +81 838 6805
Email: ave@avethailand.com